Wednesday, April 7, 2021

Deploying ASP.NET Core 3.1 Application to Azure

I have published my first YouTube video on "Deploying ASP.NET Core 3.1 Application to Azure". This video is for beginners who want to develop a simple ASP.NET Core application and deploy to Azure App Service (which is one of the serverless offering from Azure).

As a bonus, this video explains how to manager secrets in development environment (using Secrets Manager) and how to configure the application to use Azure KeyVault in production. 

Following is the link:

Deploying ASP.NET Code 3.1 Application to Azure

Please view this video and provide your valuable feedback.

Monday, July 16, 2018

What is Task Based UI

This article is now available in video format: 


When I was learning about CQRS and Event Sourcing, I stumbled upon the term Task Based UI. I haven't heard that earlier and this post is about what I had learned after that.

Task Based UI is based on users intent. What does "user intent" mean? And what is the opposite of Task Based UI?

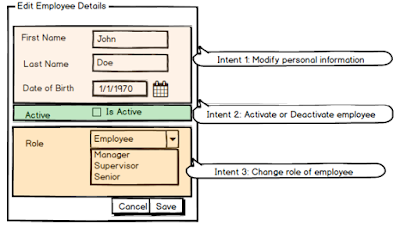
Let us take an example. In an employee management portal, there will be create/edit screen to modify all data related to an employee, something like below:


This "Edit Employee Details" has 3 intents as shown below:


This type of UI is called as CRUD (create, read, updated, delete) based UI because a single screen is used for all the user intents (like activate, change role, etc) and it just act as an interface for database operations.

The corresponding Task Based UI will have 3 different UIs for the three different intents as shown below:


Hope this serves you as a starting point to understand more about Task Based UIs. In my next blog, I am planning to cover why Task Based UIs are better choice when using Event Sourcing. 

Till then, happy coding!! 

Wednesday, August 24, 2011

C# Yield statement

I came across “Yield” statement in C# 2.0 very recently. I haven’t heard about this and so thought of exploring it a bit. This seems to be handy if you want to generate a list of items. To illustrate this let us consider a Fibonacci series generator example, first without using “Yield” and then using “Yield”.

Fibonacci generator without Yield:

    private IEnumerable<int> getFibonacciList(int num)
        {
            List<int> list = new List<int>();
            int prev = -1;
            int curr = 1;
            for (int i = 0; i < num; i++)
            {
                int next = prev + curr;
                list.Add(next);
                prev = curr;
                curr = next;
            }

            return list;
        }

This method takes an integer as parameter to indicate the length of the Fibonacci series to be generated. As you can see above, we need to create a List<int> and then add the elements to it.

Now, let us see the “Yield” statement version:

        public IEnumerable<int> generate(int num)
        {
            int prev = -1;
            int curr = 1;
            for (int i = 0; i < num; i++)
            {
                int next = prev + curr;
                yield return next;
                prev = curr;
                curr = next;
            }
        }

The above code doesn’t need any List<int> to be created. On first thought, it looks like the compiler generates the additional line of code to declare a List<int>. But in reallity there is lot more than this. If you view the compiled code in .NET Reflector tool you will find lot more code generated.

Now consider the following code that calls the above function:
           
foreach (int i in generate(10))
            {
                Console.WriteLine(i);
            }

When you step through the code in VS debugger, you will find “generate” method is being called 10 times (the value of the passed parameter). What happens is for each iteration of foreach loop, “generate” is called and this method returns as soon as it reaches “yield return”. During the next iteration the execution resumes from the line after “yield return”. This  means that C# maintains the state (like values of variable prev, curr, in our example) for each call (something like closures in javascript).

I am not clear on the real time usage of “Yield” statement. I am planning to read more on this in coming days and hopefully be in better position to list the pros/cons and usages of “Yield” in another post.

Happy coding!!

Thursday, August 4, 2011

Javascript : Call Vs Apply (Part 2)

This is part 2 of JavaScript Call Vs Apply.

Part 1 explained bit about of switching context in JavaScript and its uses. This part explains how to use Call and Apply for this and what is the difference between Call and Apply.

The only difference between Call and Apply is in how they handle the arguments. In Call you need to pass the arguments (as you do for normal function calls). In Apply you need to pass the arguments as an array. To see this in action, I am going to modify the function used in Part 1 by adding additional arguments:

function displayDetails(argOne, argTwo)
{
          alert(argOne + ‘:’ + argTwo);
}

Following is the syntax to invoke the above function using Call and Apply:

displayDetails.call(object, ‘one’, ’two’);
displayDetails.apply(object, [‘one’,’two’]);

As you could see from above, the only difference is the arguments in Call are sent separately but in Apply it is sent as an array.

One scenario where Apply could be preferred over Call is when you need to pass all the arguments of the parent function to the target function. For example, consider the following code:

function test(testOne, testTwo)
{
          displayDetails.call(this, testOne, testTwo); //works as expected.
displayDetails.apply(this, arguments); //works as expected.
}

Both the lines in the above function work correctly. It you are going to add another parameter to “test” function, then you would need to modify the first line (Call) but not the second (Apply).

function test(testOne, testTwo, testThree)
{
          displayDetails.call(this, testOne, testTwo, testThree); //need to add the additional parameter.
displayDetails.apply(this, arguments); //no changes required.
}

Hope this post was useful.

Happy coding!!

Friday, July 29, 2011

How to generate barcodes in C#?


Generating barcode is surprisingly very easy (at least in C#). Barcodes are another representation of the data (characters, numbers,etc) in a different font. To generate barcodes in your application you need to just display data in barcode fonts. There are number of free barcode fonts available. One such font is available here http://www.squaregear.net/fonts/free3of9.shtml. You could use your custom font as well.

From here I assume you have downloaded (and extracted) the above font files in F:\Downloads\free3of9 folder. I will be using the extended font in this example (fre3of9x.ttf). Also I assume you are using a windows form (C#) with a label named label1.

1.    First you need to create a font object in C# by loading the downloaded font into a font collection:

System.Drawing.Text.PrivateFontCollection fontCollection = new    System.Drawing.Text.PrivateFontCollection();

            fontCollection.AddFontFile(@"F:\Downloads\free3of9\fre3of9x.ttf");                        
FontFamily family = new FontFamily("Free 3 of 9 Extended", fontCollection);

Please note that “Free 3 of 9 Extended” is the typeface name of the barcode font downloaded from the url that I have mentioned above. You need to find out the typeface name for the barcode font that you download for your use. Specifying any other name will throw “Font cannot be found.” exception.

2.    Next you need to generate the barcode by setting the font of the label as below:
      Font font3of9 = new Font(family, 30);
            label1.Text = "This is a bar code font";
      label1.Font = font3of9;

Following is the entire barcode generation code in C#:

      private void Form1_Load(object sender, EventArgs e)
      {
System.Drawing.Text.PrivateFontCollection fontCollection = new
System.Drawing.Text.PrivateFontCollection();
fontCollection.AddFontFile(@"F:\Downloads\free3of9\fre3of9x.ttf");
FontFamily family = new FontFamily("Free 3 of 9 Extended", fontCollection);
Font font3of9 = new Font(family, 30);
           label1.Text = "This is a bar code font";
label1.Font = font3of9;
       }

The output will be as below:


Hope this post will be useful for someone as a starting point to generate barcode in C#.

Happy coding!!

Wednesday, July 20, 2011

Download image url to file

Recently, in one of my personal projects, I wanted to provide an option to save (or download) a png image url to the disk. First, as most of us do, I Googled it and found lot of solutions. But I was not able to use any snippet readily without any modifications. May be no one has encountered this scenario (as you could easily use browse “save as” functionality for this). [Updated on July 21st - I found a very elegant solution here which I have also updated at the end of this post). In interest of others who might someday need this functionality, I am providing the code snippet that I used to achieve this.

public void saveAsFile(string link)
{
          /*Get the name of the image from the link by finding the last '/' */           
          string name = link.Split('/')[link.Split('/').Length - 1];

          /*save the file with the same name in the current base directory */
          string filePath = Path.Combine(AppDomain.CurrentDomain.BaseDirectory, name);
           
          System.Net.WebRequest request = System.Net.WebRequest.Create(link);            
          System.Net.WebResponse response = request.GetResponse();
          System.IO.Stream stream = response.GetResponseStream();
           
          //convert the response stream into an image object.
          System.Drawing.Image image = System.Drawing.Image.FromStream(stream);

//save the image to a file.
          image.Save(filePath, System.Drawing.Imaging.ImageFormat.Png);           
 }

Note that I have used ImageFormat.Png as my need is to save only PNG files. You need to change this format based  on what type of image (gif,bmp,etc) you want to save.

Happy coding!!

Updated on July 21st - Looks like I am not good in Googling. I found a very elegant solutions here. I have updated the code based on this:


       public void saveAsFile(string link)
       {
         /*Get the name of the image from the link by finding the last '/' */
          string name = link.Split('/')[link.Split('/').Length - 1];

          /*save the file with the same name in the current base directory */
          string filePath = Path.Combine(AppDomain.CurrentDomain.BaseDirectory, name);

           System.Net.WebClient client = new System.Net.WebClient();
           client.DownloadFile(link, filePath);
        }

Saturday, July 16, 2011

"Default" property in C#?

I came across the "Default" keyword in VB.NET that seems to be handy in many cases. Following is the excerpt from msdn:

"A property that accepts arguments can be declared as the default property for a class. A default property is the property that Visual Basic will use when no specific property has been named for an object. Default properties are useful because they allow you to make your source code more compact by omitting frequently used property names."

I thought it would also be available in C# so that I can assign something like this: 

MyClass a = new MyClass();
a = "test";

I created a class and decorated with "DefaultProperty":

DefaultProperty("MyDefaultProperty")]
public class MyClass
{
    public string MyDefaultProperty;
}    

Now I created an instance of MyClass and assigned a string to the instance as below:

MyClass a = new MyClass();
a = "test";

But this gave me compilation error "Cannot implicitly convert type 'string' to MyClass'". Looks like there is no way to implement the "Default" behavior in C#!!

We could use operator overloading, which comes somewhat close, but it has its own disadvantage. Let us first use operator overloading and see what happens:

public class MyClass
{
           public string MyDefaultProperty;
           public string AnotherProperty;
           public static implicit operator MyClass(string value)
          {
             MyClass t = new MyClass();
             t.MyDefaultProperty = value;
           }
       }

The above  class has 2 properties, one of which is the default property. Now I don't get any compilation error when I use:

MyClass a = new MyClass();
a = "test";

This assigns the value "test" to "MyDefaultProperty" and so is equivalent to:

MyClass a = new MyClass();
a.MyDefaultProperty = “test”;

Have we achieved what we wanted? No!!  As I had mentioned earlier, this comes close to what we want and has its limitations. Now consider the following:

MyClass  a = new MyClass();
a.AnotherProperty = "another property";
a = "test";
What should be the value of a.AnotherProperty after line 3? It should be the string "another property". But as a new instance is created in the overloaded operator, the state of the object is gone and we get a brand new instance with only the default property set!!  

Is there any reason for not implementing this behavior in C# while it is available in VB.NET? It would be great if anyone throws some light on this.

Happy coding!!